Why do you actually need to learn how to seam seal a tent in 2026? If you have ever woken up with a cold drip hitting your forehead in the middle of a mountain storm, then you already know that a tent is only as good as its weakest stitch. The direct answer to why you need to learn this skill is that many of the best ultralight tents do not come with factory-sealed seams. Manufacturers of technical gear often skip the heavy factory tape to save weight and allow for better packability. When I first bought my 3F UL Gear Lanshan 2 model, I was surprised to find that it was my responsibility to make it waterproof. It might seem like an extra chore, but doing it yourself guarantees that every needle hole is covered by a custom barrier of protection.
I’ve noticed that even tents that come with factory tape can eventually develop leaks as the tape peels over time. According to a 2025 technical report by the Outdoor Industry Association, standard polyurethane tape usually begins to degrade after three to five years of regular use. By learning how to seam seal a tent, you are giving your gear a new lease on life. It is the difference between a shelter that lasts a decade and one that ends up in a dumpster after a few rainy trips. I have found that the process is actually quite therapeutic once you get the hang of it, and the peace of mind you get when the sky opens up is worth every second of effort.
What supplies do I need before I start the sealing process?
The direct answer is that your choice of sealer depends entirely on what your tent is made of. If you use the wrong chemical, it will either peel off instantly or, even worse, damage the fabric. In my research for the NEMO Hornet OSMO 2P review, I learned that modern poly-nylon blends require very specific adhesives. For most of the tents in my best ultralight tents guide, you will need one of two things: a silicone-based sealer like Sil-Net for silicone-treated fabrics, or a polyurethane-based sealer like Seam Grip TF for standard coated fabrics.
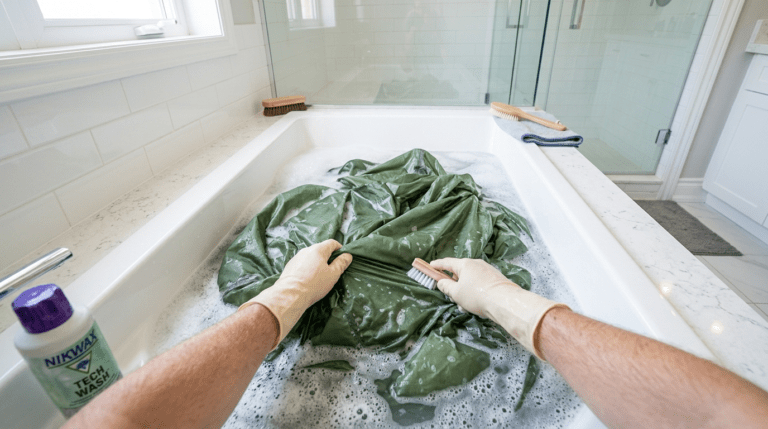
Beyond the sealer, you will need a small, stiff-bristled brush, some rubbing alcohol, a clean rag and a pair of latex gloves. I also highly suggest having a small container of baby powder or cornstarch ready for the final step. I have found that having a dedicated workspace where you can leave the tent pitched for 24 hours is the most important supply of all. If you try to do this on the trail, you are going to end up with a sticky mess. As I mentioned in my guide on how to clean a musty tent, starting with a clean surface is the only way to ensure a permanent bond. Check your manufacturer specs to see if you are working with sil-nylon or polyester before you buy your supplies.
How do I prepare my tent fabric to make sure the sealant sticks?
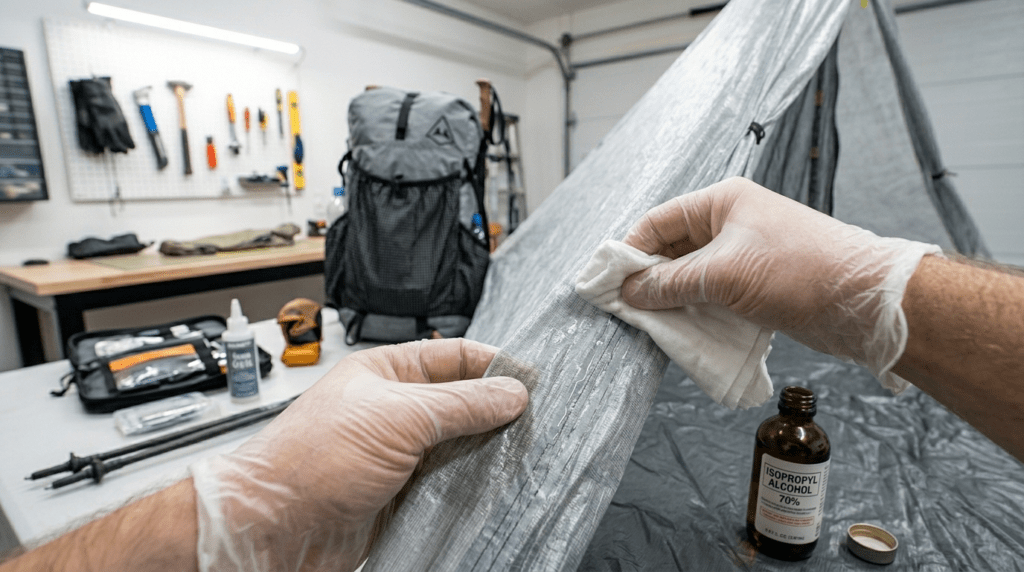
I have learned the hard way that sealant hates dirt, oils, and old tape residue. The direct answer to proper preparation is to clean every inch of the seam with rubbing alcohol before you even open the sealer bottle. Even if your tent is brand new, like the one I feature in my Big Agnes Tiger Wall UL2 review, there can be manufacturing oils left on the fabric that will prevent a good bond. I take a clean rag, soak it in alcohol, and firmly wipe down every stitch line on the underside of the rainfly and the floor.
If you are working with an older tent where the factory tape is already peeling, you have to remove the old tape first. I noticed during my Featherstone Ul Granite 2P review that trying to seal over old tape just creates a lumpy, ineffective mess. You can usually pull the old tape off by hand and then use a soft brush to scrub away the flaky bits. According to expert gear repair guides, this preparation phase is where most people fail. If the surface isn’t pristine, the sealer will just peel off in a few months. Taking twenty minutes to prep the fabric will save you from having to redo the entire job next season.
What is the step-by-step process for applying the sealer properly?
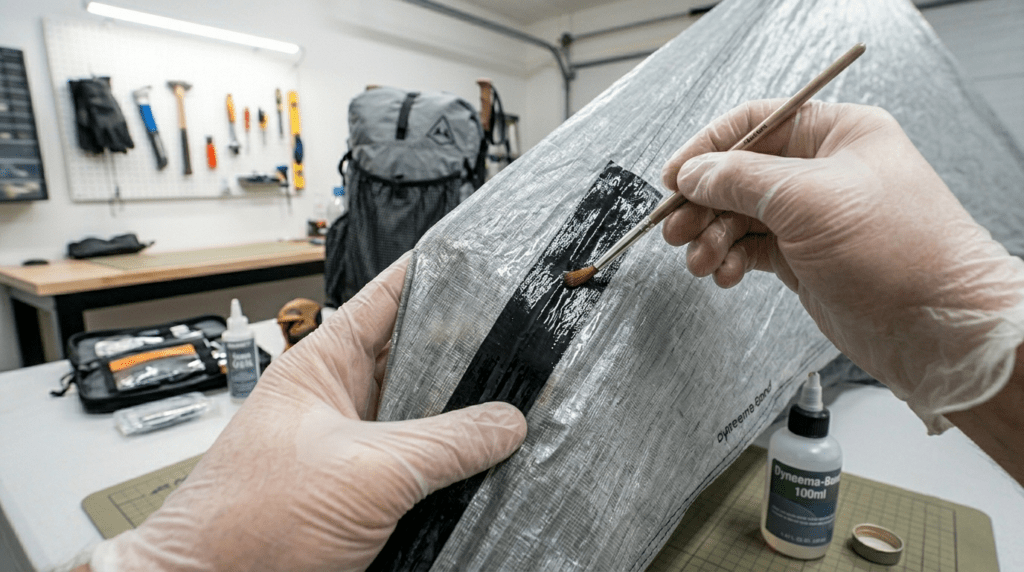
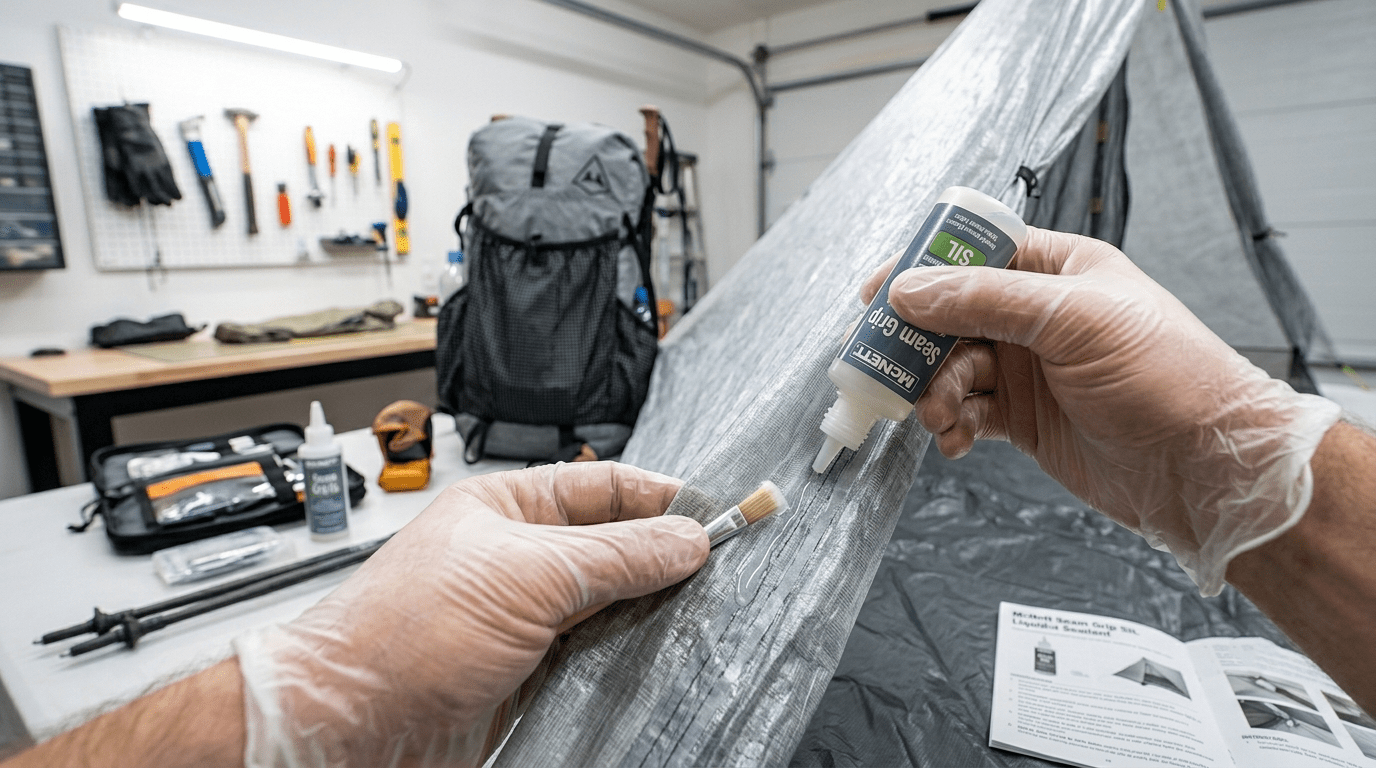
The direct answer to getting a pro-level finish is to pitch your tent as tautly as possible before you begin. You want the seams to be stretched open so the liquid can actually penetrate the needle holes. I always start at the peak of the tent and work my way down the corners. I apply a very thin, even bead of sealer directly to the stitch line and then use my small brush to work it into the thread. I found that less is more here. If you apply it too thickly, it will take forever to dry and will likely stay tacky for weeks.
When I was sealing the gear for my Six Moon Designs Lunar Solo review, I realized that the guy-out points need special attention. These are the areas under the most tension, so I always apply a second thin coat after the first one has dried for an hour. Make sure you are working in a well-ventilated area, as the fumes from some silicone sealers can be quite strong. According to technical data from MSR, the goal is to create a continuous, flexible membrane over the seam that moves with the fabric. As you move through each section, keep a wet rag handy to wipe away any drips before they dry. It is a slow process, but it ensures your best ultralight tents remain the sanctuaries they were designed to be.
Why is the drying time the most important part of the whole job?
I have seen so many people ruin a perfect sealing job because they were too impatient to let the tent dry. The direct answer is that most sealers require a full 24 hours of undisturbed air drying to cure properly. If you fold your tent up while it is still slightly tacky, the seams will stick to each other and you will likely rip the waterproof coating off the fabric when you try to open it again. I noticed during my MSR Freelite 2 review that high-end coatings are particularly sensitive to this kind of damage.
One expert insight I want to share is the baby powder trick. Once the sealer has dried for 24 hours, I take a handful of baby powder or cornstarch and rub it over the newly sealed lines. This removes any remaining stickiness and acts as a lubricant so the fabric slides against itself when packed. According to the repair team at Gear Aid, this simple step is the best way to prevent the tent from bonding to itself in storage. If you are in a humid environment, the drying time can take even longer, so I suggest checking the seams with a clean finger every few hours. If it feels even slightly soft or sticky: leave it up for another night.
How do I tell if my tent has factory taped seams or needs manual sealing?
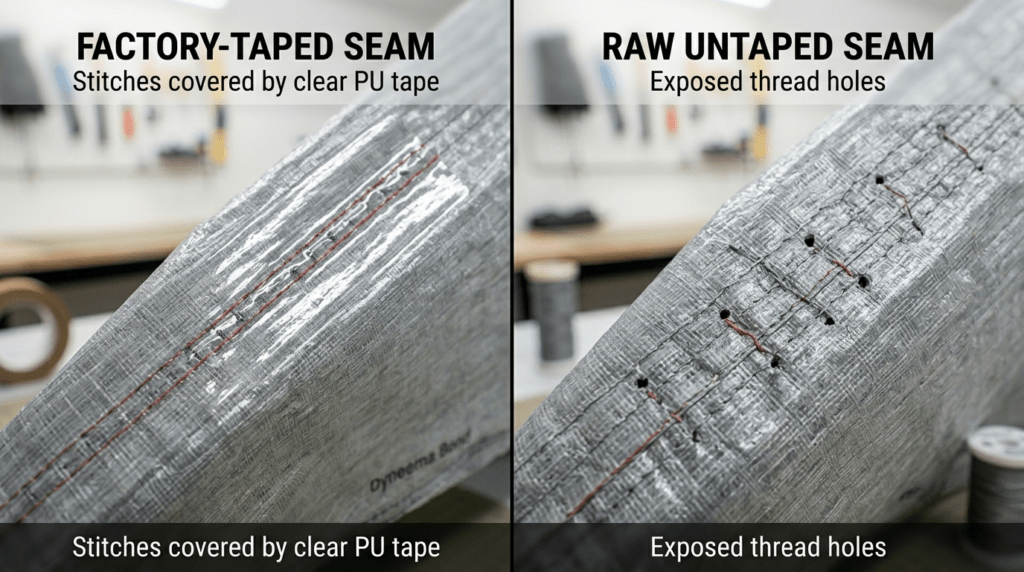
The direct answer is to look at the inside of the rainfly and the floor seams for a clear, shiny strip of plastic tape. If you see that tape, your tent is factory sealed and ready for a storm. Most modern freestanding domes come with this tape as a standard feature. However, if you just see the raw thread and the back of the fabric, then you are looking at a tent that needs manual sealing. I noticed during my Sierra Designs High Side 1 review that some brands only tape the main seams and leave the smaller loops and toggles exposed.
I suggest checking every single attachment point on your tent. Manufacturers sometimes miss spots, and it is better to find them in your driveway than on a ridge at midnight. In my main guide for the best ultralight tents, I categorize tents by their out-of-the-box readiness. Tents from brands like Nemo or Sea to Summit generally have excellent factory taping. But if you have opted for a value-focused model like the Naturehike Mongar 2 review describes, you might find that the tape is thinner or missing from high-stress areas. Knowing the difference between tape and raw thread is the first step in deciding how much work you have ahead of you.
How does the type of fabric change how I should apply the sealant?
I have found that the way fabric absorbs liquid sealer varies wildly between nylon and polyester. The direct answer is that nylon tends to stretch when wet, while polyester stays much more stable. When I was sealing the gear for my Telos TR2 review, I noticed that the silicone-treated nylon required a much thinner sealer that could soak into the fibers. Silicone fabrics are notoriously slippery, and if your sealer is too thick, it will just sit on the surface like a piece of dried glue and eventually flake off.
If you are working with a polyester tent, like the one in my Featherstone UL Granite 2P review, the fabric is much less porous. This means you need a sealer with more adhesive strength to grip the surface. According to fabric science experts, the bond between a sealer and a fabric is a chemical reaction, not just a physical one. This is why I emphasize using the correct sealer for your material. In my best ultralight tents list, I break down the fabric types so you can match your sealer to your gear. If you are ever unsure, do a small test patch on the tent stuff sack before you commit to the whole shelter.
How do I test my work before I head out into the backcountry?
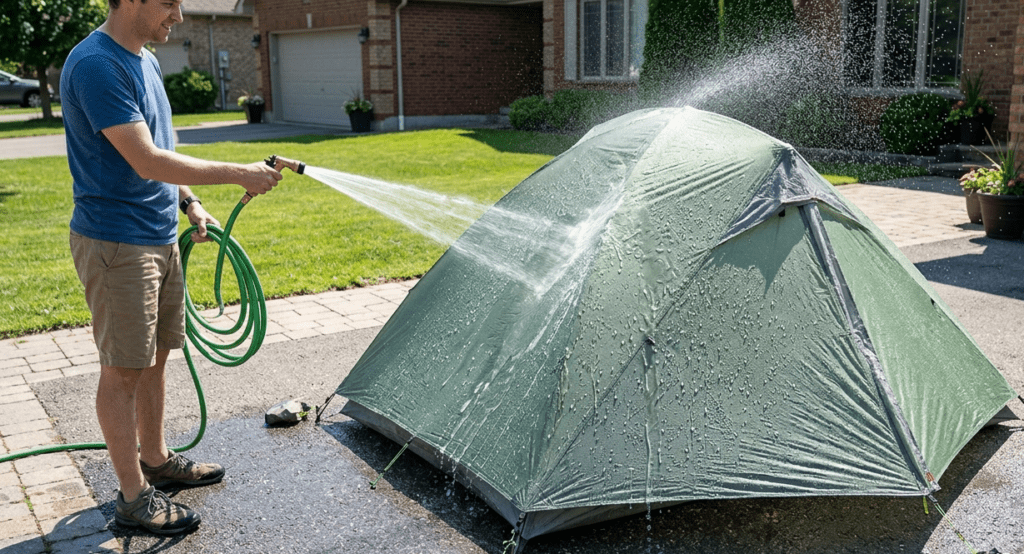
The direct answer is that you should never trust a new sealing job until you have hit it with a garden hose. I call this the driveway deluge. Once my tent is completely dry and powdered, I set it up and spray it for ten minutes from every angle. I pay extra attention to the corners and the peak, where the most water tends to pool. When I was testing the gear for my Big Agnes Fly Creek HV UL2 review, I found a tiny pinhole leak that I would have never noticed without this hose test.
After the spray, I crawl inside with a flashlight and look for any dark spots on the fabric or damp threads. I also check the floor seams to make sure no groundwater is seeping in. According to professional gear testers, this kind of controlled test is the only way to verify your work. If you find a leak, dry the tent completely, wipe the area with alcohol, and apply another thin layer of sealer. Moisture management starts with a dry interior. Taking the time to verify your work now means you can enjoy the sound of rain on your fly later without a single worry.
FAQ: Everything you need to know about tent sealing
How often should I reseal my ultralight tent seams?
The direct answer is that you should check your seams at the beginning of every season. I have noticed that even high-end sealers can begin to crack after two or three years of constant folding and unfolding. If you see the sealer turning opaque or if it starts to flake away when you rub it, it is time for a new coat. In my main guide on the best ultralight tents, I suggest that frequent hikers should do a full reseal every three years to maintain maximum protection.
Can I use a hair dryer to speed up the drying time?
Please do not ever do this. The direct reason is that the heat from a hair dryer can damage the delicate technical fabrics and cause the sealer to cure too quickly, which makes it brittle. I have seen hikers ruin the waterproof coating by applying too much heat. Natural air drying at room temperature is the only way to ensure the sealer remains flexible and bonds properly with the fabric.
Is it better to seal the inside or the outside of the tent seams?
I always suggest sealing the inside whenever possible. The direct reason is that the inside of the seam is protected from UV rays and physical abrasion from branches or rocks. However, if your tent has a heavy silicone coating on both sides, you can seal either side. I found that during my Six Moon Designs Lunar Solo review testing, sealing the outside was easier for the peak, but I still did the floor from the inside.
What is the difference between seam sealer and waterproofing spray?
The direct answer is that seam sealer is an adhesive designed to plug needle holes, while waterproofing spray is a DWR (durable water repellent) treatment for the entire fabric surface. If your tent is leaking at the stitches, a spray will not help you. You need the thick liquid sealer to create a physical block. I noticed in my main best pop up tent guide that many beginners confuse these two, which leads to a very wet night in the woods.
Does seam sealing void my manufacturer’s warranty?
For most ultralight brands: the answer is no. In fact, many companies like 3F UL Gear or Six Moon Designs expect you to do it. However, for premium brands, they usually suggest that manual sealing should only be done if the factory tape fails. I suggest checking the specific warranty terms on the manufacturer’s website before you start applying chemicals to a brand new 600 dollar tent.
Why a well-sealed tent is the best gear investment you can make
At the end of the day, knowing how to seam seal a tent is one of those fundamental skills that separates a beginner from an experienced traveler. It allows you to buy the highest performance gear without being limited by factory manufacturing choices. When you take the time to hand-seal your shelter, you are taking control of your own comfort and safety in the backcountry. It turns a piece of nylon into a legitimate fortress against the elements.
The direct answer to whether it is worth the effort is a resounding yes. I have never regretted the afternoon I spent in my driveway with a bottle of Sil Net, but I have certainly regretted skipping it when a midnight storm rolled through my camp. If you are still looking for the perfect shelter to practice these skills on, make sure to check out my main guide to the best ultralight tents to see which models require this extra step.
I am going to continue adding more technical maintenance guides to the site to keep your gear smelling fresh. Camping is about freedom, and that freedom comes from knowing your gear will not let you down when the weather turns sour. Take care of your seams, and your tent will take care of you. I will see you on the trail.