Learning how to waterproof a tent is arguably the most valuable skill in a camper’s repertoire. There is a specific kind of misery reserved for waking up at 3:00 AM to a cold, rhythmic drip hitting your forehead. It is a moment that transforms a relaxing wilderness escape into a high-stakes survival situation.
In our modern “throwaway” culture, most people assume that once a tent starts leaking, its life is over. They see the flaking coating or the peeling tape and assume the fabric has “worn out.” In reality, a tent is a complex system of chemical and mechanical barriers that can and should be maintained. As a lead gear analyst who has put hundreds of shelters through high-pressure “torture” testing, I can tell you that a properly restored 10-year-old tent can often outperform a brand-new budget model off the shelf.
In this ‘How to waterproof a tent’ guide, we are going to dive deep into the technical side of tent maintenance. We will cover the chemistry of polyurethane breakdown (hydrolysis), the physics of seam sealing, the industry shift in DWR technology, and the step-by-step protocols for restoring every waterproof layer of your shelter.
Anatomy of a Dry Tent (The Triple Barrier Defense)
To fix a leak effectively, you must first understand the three-tier defense system that keeps you dry. Tents do not rely on a single “waterproof fabric.” Instead, they utilize a hierarchy of treatments that work in tandem. A failure in any one of these layers compromises the entire system.
1. DWR (Durable Water Repellent): The Surface Tension Warrior
This is the “invisible” chemical treatment on the outside of your tent fabric. DWR is not a physical barrier; it is a surface treatment that increases the contact angle of water droplets. It makes the fabric “hydrophobic,” causing water to bead up and roll off rather than soaking into the fibers.
When DWR fails, the fabric “wets out.” While the interior coating might still be intact, a wetted-out fabric becomes heavy, prevents moisture from escaping (causing massive internal condensation), and increases the rate of heat loss through the walls via evaporative cooling.
2. The PU (Polyurethane) Coating: The Internal Shield
This is the heavy hitter. It is a thin, rubbery film applied to the inside of the rainfly and the tent floor. This is what provides the actual Hydrostatic Head (HH) rating, a measurement of how much water pressure (in millimeters) the fabric can withstand before it leaks.
PU coatings are flexible and durable, but they are vulnerable to a chemical process called hydrolysis. This is when water molecules bond with the polyurethane polymer chains, causing them to break down, become sticky, and eventually flake off.
3. Seam Tape: The Mechanical Bridge
Because every tent is sewn together, there are thousands of tiny needle holes along the seams. Even a 10,000mm HH fabric will leak if the seams are open. Factory “taping” involves heat-welding a clear strip of polyurethane tape over these holes. This is usually the first point of failure in any tent, as the adhesive dries out, turns yellow, and begins to “delaminate” from the fabric.
The Deep Science of Failure (Why Tents Leak)
Before we get to the “how-to,” we need to understand the why. Gear failure is rarely random; it is almost always a result of chemical or physical stress.
1. The Hydrolysis Nightmare (Sticky Fly Syndrome)
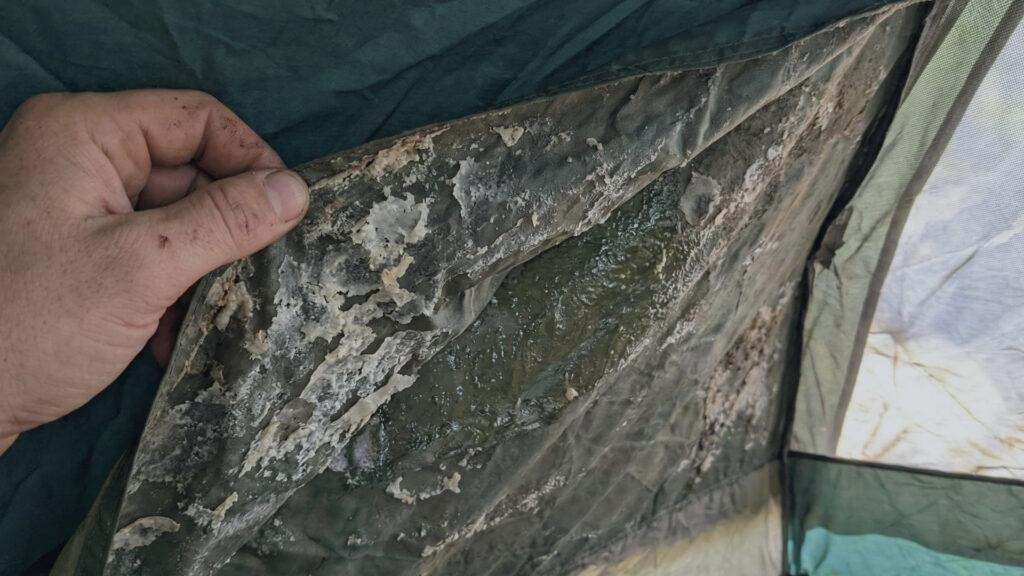
Hydrolysis is the most common “death” of a high-end tent. It happens when a tent is stored damp. The water molecules physically attack the ester bonds in the polyurethane coating. This creates two distinct symptoms:
- The Smell: A distinct odor often compared to vomit, old gym socks, or “rancid” chemicals. This is the byproduct of the polymer chains breaking.
- The Stickiness: As the polymer breaks down, it reverts to a liquid-like, tacky state. If you try to pull your rainfly apart and it feels like it’s glued together, your PU coating is in the final stages of failure.
2. UV Degradation: The Silent Slicing
Sunlight is a form of radiation. UV rays act like microscopic scissors, cutting the molecular bonds in both the nylon fibers and the waterproof coatings. A tent left up in the sun for 3 months can lose up to 50% of its tear strength and the majority of its waterproof integrity.
3. Abrasion and Micro-Friction
On the tent floor, “pinhole” leaks are caused by micro-abrasion. Even tiny grains of sand between your footprint and your tent floor act like sandpaper, grinding away the micron-thin layer of PU coating every time you move inside.
Diagnosis: The Expert’s “Leak Detection” Protocol
Before you spend money on sealants, you must distinguish between a mechanical leak and a ventilation failure. I have seen countless campers “re-waterproof” a tent that wasn’t actually leaking; they were just experiencing heavy condensation.
The “Wet Paper” Stress Test
Set up your tent on a dry day in your backyard.
- Internal Setup: Place several sheets of dry paper towel inside, taped to the walls and spread across the floor.
- External Simulation: Use a garden hose with a spray nozzle set to “shower” or “mist.” Avoid using a high-pressure jet, as this can force water through even a healthy tent via sheer kinetic energy.
- Observation: Spray the tent continuously for 30 minutes.
The Results:
- Scenario A (Bone Dry Paper): Your tent is waterproof. The “leaks” you felt in the field were actually condensation from your breath. You need more ventilation, not more sealant.
- Scenario B (Wet Seams): If water is pooling at the toggles, zippers, or corners, your seam tape has failed.
- Scenario C (Fine Mist): If the paper is damp across its entire surface, the interior PU coating has degraded.
- Scenario D (Floor Seepage): If the floor paper is wet where you knelt, the floor’s pressure-resistance is gone.
Preparation: The “Deep Clean” and Stripping Phase
If you’re wondering how to waterproof a tent, you cannot waterproof a dirty tent. Applying sealant over dirt, body oils, or old, flaking coating is a recipe for failure. The new layer will simply bond to the debris and peel off within a few uses.
1. The Solvent Soak (Removing Hydrolysis)
If your tent is sticky, you must strip the dead coating.
- The Tub Soak: Fill a bathtub with lukewarm water and a specialized gear cleaner like Nikwax Tech Wash.
- The Scrub: Use a soft-bristle brush to gently agitate the sticky surfaces.
- The Alcohol Method: For stubborn, flaking sections, a 70% Isopropyl Alcohol solution can help dissolve the remaining adhesive. Apply to a cloth and wipe. Do not pour alcohol directly onto the fabric, as it can weaken the nylon fibers if left to soak too long.
2. Mold and Mildew Treatment: The Organic Threat
If you see black or green spots, you have mold. Mold doesn’t just look bad; it eats the fabric fibers. Use a solution of Mirazyme or a specific enzyme cleaner. Avoid bleach at all costs. Bleach is an oxidizer that will permanently destroy the tensile strength of the nylon and leave it brittle.
Seam Sealing (The Precision Strike)
Seam sealing is the most common and effective repair you can perform. Even high-end expedition tents like those from Hilleberg or MSR will eventually need their seams refreshed.
Matching Chemistry: PU vs. Silicone
This is where most DIYers fail. You must match the sealant to the fabric’s coating.
- PU/Polyurethane Fabrics: Most standard tents (Coleman, Big Agnes, etc.). Use Gear Aid Seam Grip WP.
- Silnylon/Silicone Fabrics: High-end ultralight tents. Use Gear Aid Seam Grip SIL.
- Note: Silicone will not stick to PU, and PU will not stick to Silicone. If you use the wrong one, it will peel off like a sticker.
The Application Protocol
- Setup: Pitch the tent inside-out. This is crucial because you want to seal the inside of the seam where the pressure is lowest.
- Remove Old Tape: Gently pull away any peeling factory tape. If the tape is still firmly attached, do not rip it off; just trim the loose ends.
- Wipe with Alcohol: This removes any oils and “preps” the surface for a chemical bond.
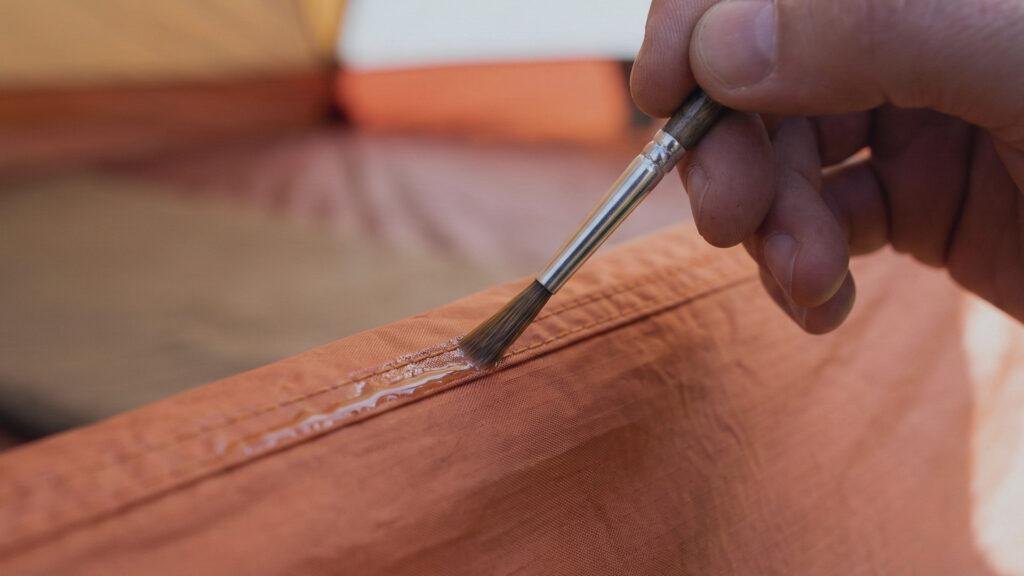
- Paint the Seams: Use a small, 1/2-inch flat brush. Apply a thin, translucent layer over the stitching. Do not over-apply; a thick layer is more prone to cracking as the fabric flexes.
- The “Crossover” Rule: Pay double attention to where vertical seams meet horizontal seams (the four-way junctions). These are the most common failure points.
- Curing: Let the tent sit for 24 hours in a low-humidity environment.
- The Talc Trick: Once dry, the sealant will still be slightly tacky. Dust the seams with baby powder or cornstarch. This prevents the seams from sticking to the fly when you roll it up (a phenomenon called “blocking”).
Refreshing the DWR (The External Shield)
DWR is the first line of defense in how to waterproof a tent. When it fails, the “wetting out” process begins. Modern DWR has changed; the industry has moved from “C8” (long-chain fluorocarbons) to “C6” and PFC-free versions due to environmental concerns. These newer versions are safer but require more frequent maintenance.
The Spray-On Protocol
- Clean first: DWR often fails simply because it is clogged with dirt, campfire smoke, or skin oils. Wash the tent before re-treating.
- Apply while wet: Most modern DWR sprays (like Nikwax SolarProof) work best when the fabric is already damp. This allows the treatment to follow the moisture into the weave of the fabric for better coverage.
- Even Application: Spray from about 6 inches away. Use a damp microfiber cloth to “buff” the liquid into the fabric. If you see white streaks or drips, you have applied too much.
- Dry in the Shade: Do not dry a tent in direct, harsh sunlight after a DWR treatment, as the heat can cause the treatment to cure unevenly.
Restoring the Floor (High-Pressure Waterproofing)
The tent floor is the hardest-working part of your shelter. It is subjected to constant “hydraulic pressure” from your knees, elbows, and sleeping pads. A floor that holds water at 1,000mm HH will still leak if you kneel on it (which exerts roughly 3,000mm of pressure).
The “Tent Sure” Method
If the floor is leaking, you need a high-build polyurethane sealant.
- Clean the underside: The bottom of the floor is usually where the abrasion happens.
- Paint the Interior: Apply the sealant to the inside of the floor. This protects the new coating from being scratched off by rocks and sticks on the ground.
- The Multiple Coat Approach: For heavy-use floors, two thin coats are always better than one thick coat. Let the first coat dry for 12 hours before applying the second.
Tips for Longevity
As someone who looks at gear through a long-term lens, knowing how to waterproof a tent is as much about prevention as it is about repair.
- UV is the Silent Killer: UV radiation doesn’t just fade the color; it breaks down the molecular bonds of the PU coating. If you are base-camping for a week, pitch in the shade or use a UV-protectant spray like 303 Marine Fabric Guard.
- The “Lofty” Storage Rule: Never store your tent in its tight compression sack for long periods. This creates sharp “micro-creases” in the waterproof coating that eventually lead to cracks. Store it loosely in a large mesh or cotton bag.
- The Footprint Necessity: A footprint is not just for keeping the tent clean; it creates a sacrificial barrier. It’s much cheaper to replace a $30 footprint than it is to re-waterproof a $400 tent floor.
Emergency Field Repairs (The “Mid-Storm” Save)
What if you’re already in the woods and the rain starts coming through?
- Tenacious Tape: Apply to the outside of the fly. Unlike duct tape, it won’t leave a gooey residue and it handles moisture much better.
- The “Tarp Fly”: If the coating is misting, throw a cheap emergency space blanket or a lightweight tarp over the tent. This diverts the bulk of the water, allowing the tent’s failing coating to handle only the “splash-back.”
- Strategic Pitching: If you know your tent is weak, pitch on high ground and use every guy line. A taut tent sheds water much more effectively than a sagging one.
Check out our best winter tents if you’re looking for something like that!
Frequently Asked Questions: How to Waterproof a Tent
As an analyst, I see the same questions pop up in the camping community every season when it comes to how to waterproof a tent. Most “leaks” are actually preventable maintenance issues. Here are the technical answers to the most common queries regarding tent restoration.
This distinct odor is the chemical signature of hydrolysis. It occurs when the polyurethane (PU) coating on the interior of your rainfly or floor breaks down due to moisture exposure during storage. The smell is the byproduct of the polymer chains literally rotting.
The Fix: You cannot simply “wash away” the smell because the coating itself is the source. You must strip the failing coating entirely using a soft brush and isopropyl alcohol, then apply a new layer of PU sealant like Gear Aid Tent Sure. If the smell persists after stripping, an enzyme cleaner like Mirazyme can neutralize the organic odors.
As a gear analyst, my professional advice is absolutely not. Flex Seal is an thick, non-breathable rubberizing agent designed for gutters and pipes. It is far too heavy for tent fabrics and will eventually peel off, leaving a sticky residue that makes professional restoration impossible. Duct tape adhesive also degrades under UV light, leaving a “goo” that ruins the fabric’s surface tension. For emergency field repairs, use Tenacious Tape; for permanent waterproofing, use dedicated gear sealants.
This is the most common diagnostic error. Before you start sealing, perform the “Wet Paper Test.” Tape a dry paper towel to the inside of the tent wall. Spray the outside with a hose for 15 minutes.
If the paper towel has wet spots, you have a mechanical leak that requires sealant.
If the paper towel is bone dry but the walls feel damp or “sweaty,” you have a condensation issue. You need to open your vents and increase airflow.
Never. Even on a “delicate” cycle, the mechanical agitation of a washing machine, especially a top-loader with an agitator, can stretch the fabric, delaminate the seam tape, and strip the DWR coating prematurely. Always hand-wash your tent in a bathtub or a large bin using a non-detergent soap like Nikwax Tech Wash.
Seam tape is held on by a heat-activated adhesive. Over time, heat (from storage in a hot garage or attic) and humidity cause that adhesive to dry out and lose its bond. Once it turns yellow and brittle, it is no longer providing a waterproof seal. You should gently trim away the peeling sections and manually seal the exposed stitching with a liquid urethane sealer.
It depends on the structural integrity of the fabric. If the nylon is still strong and hasn’t been “sun-rotted” (UV degraded), a $20 bottle of sealant can give a $100 tent several more years of life. However, if the fabric tears easily like wet paper, the UV damage is too deep, and no amount of sealant will make it safe for a storm.
For the average camper (2-3 trips per year), I recommend a DWR refresh once every two seasons. If you camp in high-abrasion environments (sand, salt air) or frequent heavy rain, you should do it annually. A quick way to check is to splash water on the fly; if it doesn’t bead up into perfect spheres, it’s time for a refresh.
Hydrostatic Head is a measurement of the fabric’s internal coating (how much pressure it can take before water is pushed through the weave). Waterproof sprays (DWR) are external treatments that help the fabric shed water so it doesn’t become heavy and “wet out.” You need both for a high-performance tent.
While it’s tempting, I advise against it. High heat can cause the solvent in the sealer to evaporate too quickly, leading to bubbles or a brittle bond. It can also damage the thin nylon fabric. Let it cure naturally in a shaded, well-ventilated area for the full 24 hours.
Indirectly, yes. A footprint creates a sacrificial layer that protects the waterproof PU coating on your tent floor from being ground away by rocks and dirt. By preventing abrasion, the footprint ensures your floor’s HH rating remains intact for much longer.
Wrapping Up
If you read up to now, I hope you have a clear idea of how to waterproof a tent. Waterproofing your tent isn’t just about staying dry; it’s about protecting your investment and your safety. A single afternoon spent maintaining your gear can save you hundreds of dollars and ensure that your next backcountry adventure doesn’t end in a soggy retreat.
Whether you are restoring a vintage family heirloom or prepping a modern ultralight shelter for a thru-hike, the chemistry remains the same: Clean, Strip, Seal, and Protect. Take the time to do it right, and your tent will thank you when the sky opens up.
{ “@context”: “https://schema.org”, “@graph”: [ { “@type”: “Article”, “@id”: “https://campedtoohard.com/how-to-waterproof-a-tent/#article”, “headline”: “How to Waterproof a Tent: The Ultimate Restoration Guide”, “description”: “Learn how to waterproof a tent like a pro. This guide covers the chemistry of hydrolysis, technical seam sealing, and DWR restoration protocols.”, “image”: “https://campedtoohard.com/wp-content/uploads/2026/02/how-to-waterproof-a-tent-expert-restoration.jpg”, “author”: { “@type”: “Person”, “name”: “Owen Becker”, “url”: “https://campedtoohard.com/author/owenbecker/” }, “publisher”: { “@type”: “Organization”, “name”: “Camped Too Hard”, “logo”: { “@type”: “ImageObject”, “url”: “https://campedtoohard.com/wp-content/uploads/2025/11/Camped-Too-Hard-Logo-White-1-2048×512.png” } }, “datePublished”: “2026-03-01T08:00:00-08:00”, “dateModified”: “2026-03-01T08:00:00-08:00”, “mainEntityOfPage”: { “@type”: “WebPage”, “@id”: “https://campedtoohard.com/how-to-waterproof-a-tent/” } }, { “@type”: “HowTo”, “name”: “How to Waterproof a Camping Tent”, “description”: “A comprehensive protocol for restoring the waterproof integrity of synthetic camping tents.”, “estimatedCost”: { “@type”: “MonetaryAmount”, “currency”: “USD”, “value”: “25” }, “supply”: [ { “@type”: “HowToSupply”, “name”: “Nikwax Tech Wash” }, { “@type”: “HowToSupply”, “name”: “Gear Aid Seam Grip WP” }, { “@type”: “HowToSupply”, “name”: “Isopropyl Alcohol (70%)” }, { “@type”: “HowToSupply”, “name”: “DWR Spray (Nikwax SolarProof)” } ], “tool”: [ { “@type”: “HowToTool”, “name”: “Soft-bristle brush” }, { “@type”: “HowToTool”, “name”: “Bathtub or large bin” }, { “@type”: “HowToTool”, “name”: “1/2 inch flat brush” } ], “step”: [ { “@type”: “HowToStep”, “url”: “https://campedtoohard.com/how-to-waterproof-a-tent/#step1”, “name”: “Deep Clean and Strip”, “text”: “Hand-wash the tent in a tub with gear cleaner. Use alcohol to strip flaking PU coatings caused by hydrolysis.”, “image”: “https://campedtoohard.com/wp-content/uploads/2026/01/tent-hydrolysis-polyurethane-damage.jpg” }, { “@type”: “HowToStep”, “url”: “https://campedtoohard.com/how-to-waterproof-a-tent/#step2”, “name”: “Seam Sealing”, “text”: “Apply liquid urethane sealer to the interior seams, focusing on crossover points where multiple panels meet.”, “image”: “https://campedtoohard.com/wp-content/uploads/2026/01/precision-tent-seam-sealing-technique.jpg” }, { “@type”: “HowToStep”, “url”: “https://campedtoohard.com/how-to-waterproof-a-tent/#step3”, “name”: “DWR Refresh”, “text”: “Spray the exterior rainfly with a DWR treatment while damp to restore hydrophobic water beading.” } ] }, { “@type”: “FAQPage”, “mainEntity”: [ { “@type”: “Question”, “name”: “My tent smells like old gym socks or vomit. Can I fix the smell?”, “acceptedAnswer”: { “@type”: “Answer”, “text”: “This odor is caused by hydrolysis (chemical breakdown of the PU coating). You must strip the failing coating with isopropyl alcohol and re-apply a new PU layer.” } }, { “@type”: “Question”, “name”: “Can I use Flex Seal or duct tape for a quick fix?”, “acceptedAnswer”: { “@type”: “Answer”, “text”: “No. Flex Seal is too heavy and non-breathable, while duct tape leaves a residue that ruins the fabric surface tension. Use Tenacious Tape for emergency field repairs.” } }, { “@type”: “Question”, “name”: “How do I know if it’s a leak or just condensation?”, “acceptedAnswer”: { “@type”: “Answer”, “text”: “Perform the ‘Wet Paper Test.’ Tape a dry paper towel inside the tent and spray with a hose. If the paper stays dry but the walls feel damp, it is condensation. If the paper gets wet, it is a leak.” } }, { “@type”: “Question”, “name”: “Can I put my tent in the washing machine?”, “acceptedAnswer”: { “@type”: “Answer”, “text”: “Never. Mechanical agitation can stretch the fabric, delaminate seam tape, and strip DWR coatings. Always hand-wash your tent in a bathtub or large bin.” } }, { “@type”: “Question”, “name”: “Why is my seam tape turning yellow and peeling?”, “acceptedAnswer”: { “@type”: “Answer”, “text”: “Heat and humidity eventually cause the adhesive on factory seam tape to dry out and lose its bond. You should trim the loose parts and manually seal the stitching with a liquid urethane sealer.” } }, { “@type”: “Question”, “name”: “Is it worth re-waterproofing a budget tent?”, “acceptedAnswer”: { “@type”: “Answer”, “text”: “Yes, provided the fabric is still strong. If the nylon hasn’t been severely UV-degraded (feeling brittle or tearing like paper), a small investment in sealant can extend its life by several years.” } }, { “@type”: “Question”, “name”: “How often should I refresh my tent’s DWR?”, “acceptedAnswer”: { “@type”: “Answer”, “text”: “For the average camper, we recommend a refresh once every two seasons. If you camp frequently in heavy rain or high-abrasion environments, an annual treatment is best.” } }, { “@type”: “Question”, “name”: “What is the difference between Hydrostatic Head (HH) and waterproof sprays?”, “acceptedAnswer”: { “@type”: “Answer”, “text”: “HH measures the internal coating’s resistance to water pressure. Waterproof sprays (DWR) are external treatments that help the fabric shed water so it doesn’t become heavy or saturated.” } }, { “@type”: “Question”, “name”: “Can I use a hair dryer to speed up the curing of seam sealer?”, “acceptedAnswer”: { “@type”: “Answer”, “text”: “No. High heat can cause the solvent to evaporate too quickly, leading to bubbles or a brittle bond. It can also damage thin nylon fabric. Let it cure naturally for 24 hours.” } }, { “@type”: “Question”, “name”: “Does a footprint help with waterproofing?”, “acceptedAnswer”: { “@type”: “Answer”, “text”: “Indirectly, yes. A footprint creates a sacrificial layer that protects the waterproof PU coating on your tent floor from being ground away by rocks and dirt.” } } ] } ] }