If you have ever shivered through a winter night in a nylon dome, you might be asking yourself: What is a hot tent, and how can it change your winter experience? Winter camping usually implies suffering, waking up with frozen boots, struggling to change clothes in sub-zero temperatures, and diving into a sleeping bag at 5:00 PM just to stay warm.
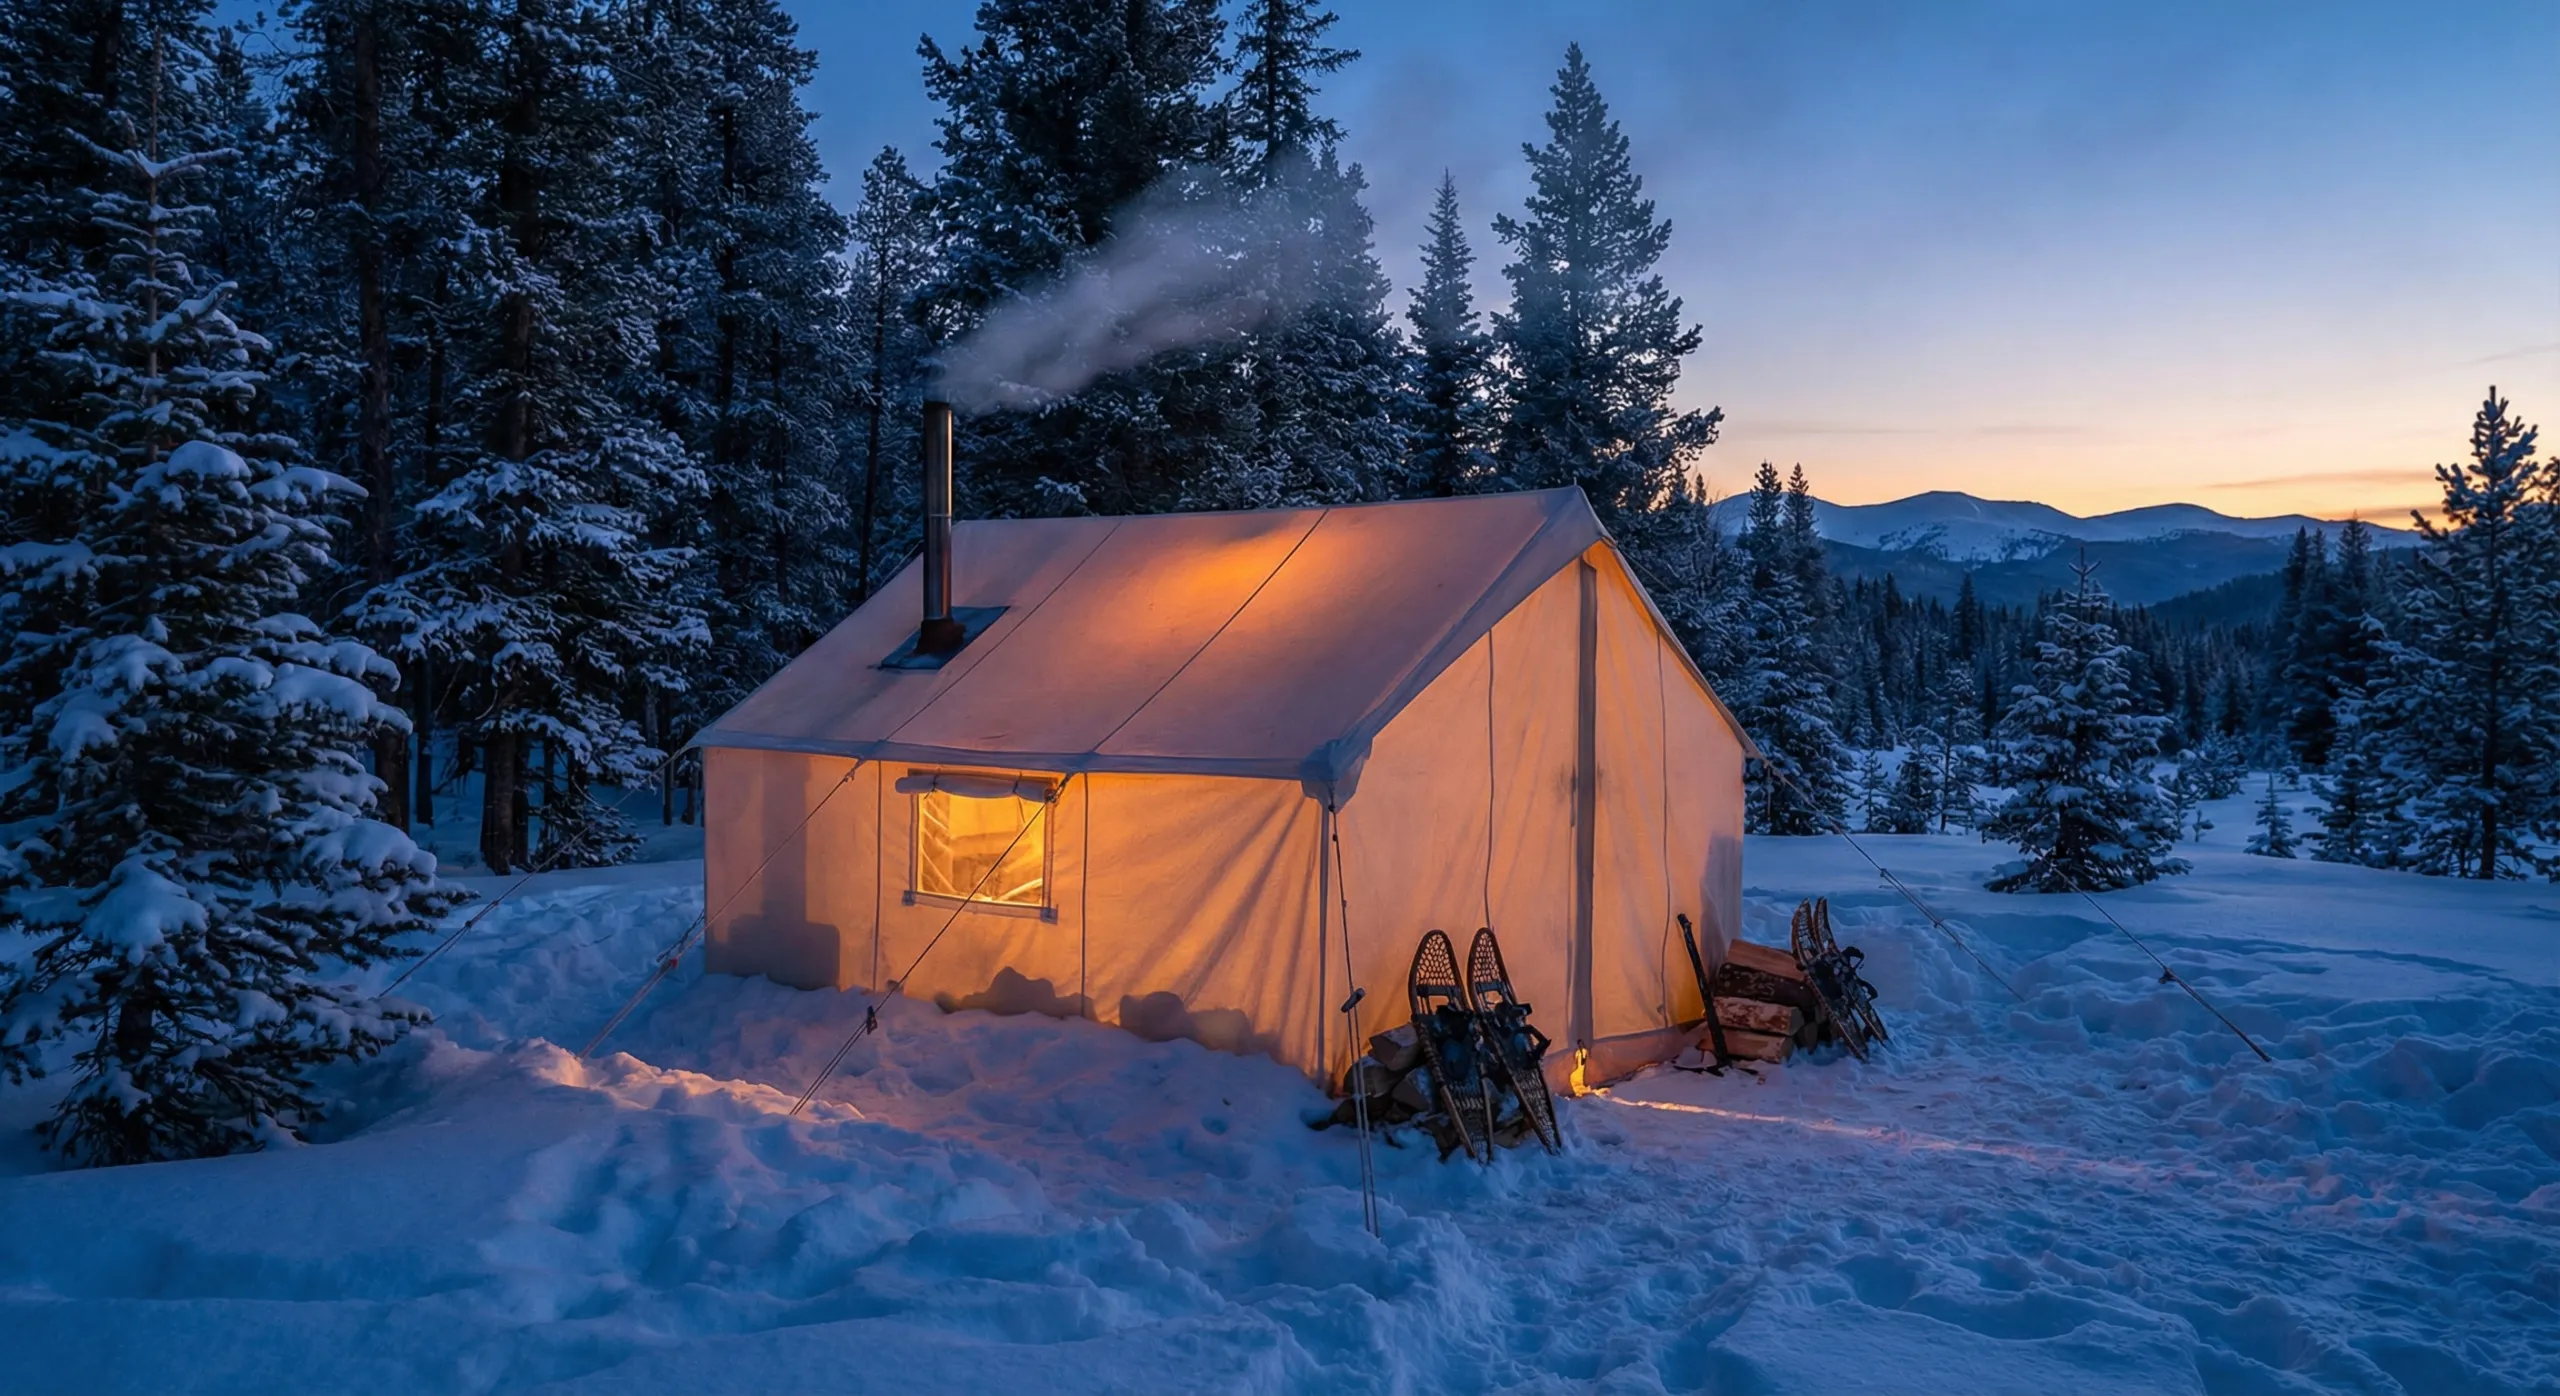
In simple terms, a hot tent is a shelter designed to safely accommodate a wood-burning stove inside. Unlike standard 3-season tents, which rely on passive body heat and insulation to keep you alive, a hot tent actively generates heat. It features a heat-resistant port (called a stove jack) that allows a chimney pipe to pass through the fabric without melting it.
This simple addition transforms winter camping from a survival endurance test into a comfortable, enjoyable experience. Instead of wearing a parka to bed, you can sit inside in your t-shirt while it is -10°F outside. You can dry your wet gear, cook bacon on top of the firebox, and enjoy a living room atmosphere in the middle of a frozen wilderness.
In this thorough guide, we will break down the mechanics of hot tent camping, the physics of wood stoves, the specific gear you need, and why this traditional method is making a massive comeback among modern campers. We will cover everything from selecting the right firewood to preventing carbon monoxide poisoning.
The Core Philosophy of Hot Tenting
To understand the equipment, you must first understand the philosophy. Standard backpacking is about insulation. You fight the cold by trapping your body heat inside layers of down and synthetic fibers. You are fighting a defensive battle against the elements.
Hot tenting is about heat generation. You are bringing an external heat source into your shelter. This changes the entire dynamic of the trip from defensive to offensive.
The Microclimate Advantage
In a standard winter tent, the temperature inside is rarely more than 5-10 degrees warmer than the outside air. If it is -20°F outside, it is -10°F inside. Your water bottle will still freeze. Your breath will still condense and freeze on the walls.
In a canvas hot tent, you create a controlled microclimate. A small titanium or steel stove can easily raise the interior temperature to 70°F or 80°F, even when it is well below freezing outside. This allows for:
- Active Drying: Moisture is the enemy in winter. Sweat in your base layers or snow in your boots will freeze, leading to hypothermia. In a cold tent, you have to sleep with damp clothes to dry them with body heat. In a hot tent, the dry heat drives moisture out. You can hang wet socks, boot liners, and gloves on a drying line near the stove ceiling. They will be bone dry in an hour. This resets your gear every day, preventing the dangerous accumulation of ice in your insulation.
- Dexterity: You can take your gloves off. This allows you to cook, repair gear, organize your pack, or play cards without losing finger function.
- Psychological Well-being: Winter nights are long. In a cold camp, you go to sleep when the sun goes down because it is too cold to sit outside. In a hot tent, the group gathers around the stove. It becomes a communal hub. You can sit on lightweight chairs or pads, play games, and enjoy the evening. This prevents the cabin fever that sets in when you are confined to a mummy bag for 14 hours.
What is a Hot Tent: The Anatomy
A hot tent camping system is composed of two non-negotiable components: the tent structure and the stove system. You cannot simply put a heater in any tent and call it a hot tent; that is a recipe for melting your shelter or carbon monoxide poisoning.
1. The Tent Body: Materials Matter
The material of your tent dictates how it handles heat, moisture, and weight. There are two main schools of thought here: Traditional Canvas and Modern Synthetic.
Canvas (Cotton & Poly-Cotton Blend)
This is the traditional material used by outfitters, hunters, and winter veterans. We discussed the benefits of canvas in our review of the Teton Sports Mesa Canvas Tent (which works well as a 4-season shelter).
- Breathability: This is the single biggest advantage. When you run a stove, you create a massive temperature differential between the inside and outside. In a plastic tent, this causes massive condensation (it rains inside). Canvas breathes, allowing moisture to escape through the weave.
- Heat Retention: Canvas is heavy and thick. It holds heat longer than thin nylon, creating a more stable temperature.
- Safety: Cotton does not melt. If a stray spark lands on it, it might singe or create a tiny hole, but the tent will not catastrophically fail or shrink-wrap around you.
- The Downside: Weight. A canvas hot tent can weigh 20 to 80 pounds. This is strictly for car camping or pulk (sled) hauling.
Silnylon & Polyester (Ultralight)
Modern technology has allowed for hot tents that weigh less than 4 pounds. These are usually teepee-shaped tents made from silicone-impregnated nylon.
- Portability: You can carry these in a backpack. This opens up deep backcountry winter camping to solo hikers.
- Shedding Snow: The slippery nature of silnylon sheds snow loads better than the rough texture of canvas.
- The Downside: Condensation. These tents are not breathable. You must manage vents carefully, or you will wake up wet. Most modern designs use a “double wall” or extensive venting to mitigate this.
- The Danger: Nylon melts instantly. If a hot stove pipe touches the fabric without a proper jack, or if a spark lands on the roof, it burns a hole immediately.
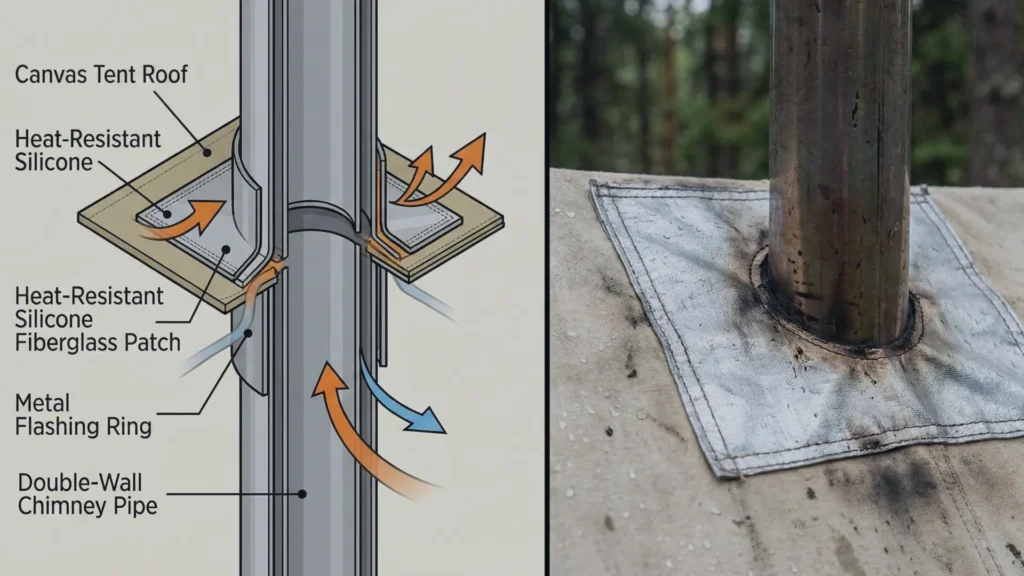
2. The Stove Jack Tent
This is the defining feature. A stove jack is a patch of fireproof material sewn into the roof or wall of the tent. It has a hole in the center for the stovepipe.
- Material: Usually silicone-coated fiberglass or a Kevlar blend. It can withstand temperatures exceeding 1000°F.
- Function: It isolates the screaming-hot metal pipe (which can reach 800°F) from the flammable tent fabric.
- Rain Flap: Good stove jacks have a velcro or roll-up cover to seal the hole when you are not using a stove, preventing rain or snow from entering.
3. The Snow Skirt
Unlike 3-season tents, where airflow under the fly is good, winter tents need to be sealed to the ground to stop drafts. A “snow skirt” or “sod cloth” is an extra 8-10 inch strip of fabric at the bottom of the tent perimeter. You pile snow onto this skirt to bury the edges of the tent, effectively sealing it against the wind and anchoring it to the ground. This trap heat inside and prevents spindrift (blowing snow) from entering.
The Wood Stove System
The stove is the heart of the hot tent. It gets better when winter camping with stove. It is not just a metal box; it is a precision-engineered machine designed to burn wood efficiently in a small space.
Types of Hot Tent Stoves
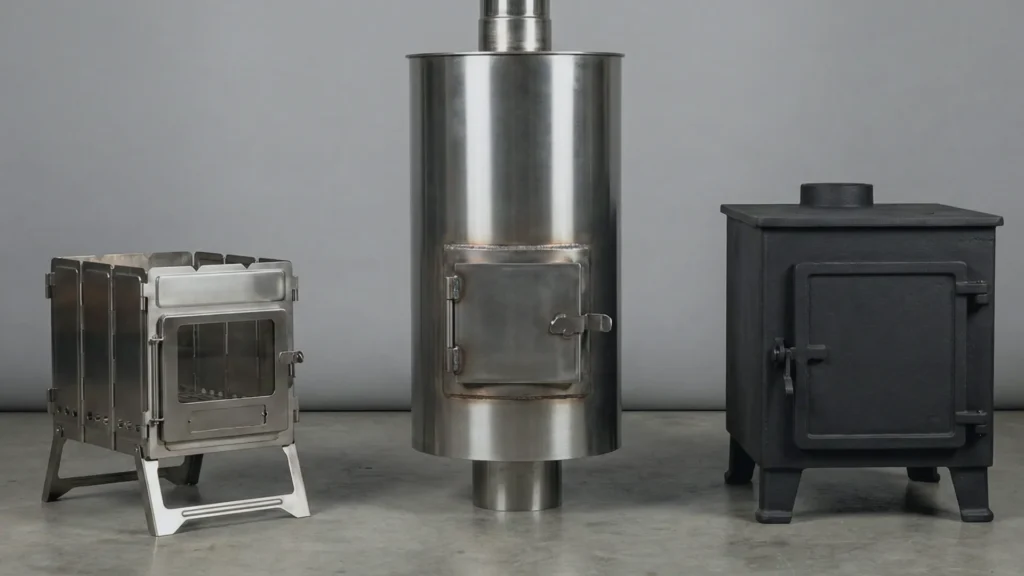
1. Folding Titanium Stoves
These are the darlings of the backpacking world. Made from wafer-thin titanium sheets, they fold completely flat (like a laptop).
- Weight: 2 lbs to 4 lbs.
- Pros: Incredible portability; rust-proof; high melting point.
- Cons: Expensive ($300-$500). Thin metal cools down instantly when the fire dies. Titanium can warp under high heat if not assembled correctly.
2. Cylinder Stoves (Steel)
Often made of galvanized or stainless steel, these look like barrels on legs.
- Weight: 15 lbs to 30 lbs.
- Pros: Very durable; round shape prevents warping. Holds heat well.
- Cons: Bulky; shape is awkward to pack in a sled.
3. Box Stoves (Steel/Iron)
The classic ammo can style.
- Weight: 20 lbs to 50+ lbs.
- Pros: Cheap; holds heat the longest due to thermal mass. Flat top is excellent for cooking.
- Cons: Heavy. Prone to rust if not oiled.
The Chimney (Stove Pipe)
The pipe is just as important as the stove. It provides the “draft” (airflow) that keeps the fire burning and sucks smoke out of the tent.
- Nesting Pipes: Sections of pipe that slide inside each other. Bulky but sturdy.
- Roll-Up Pipes: A single sheet of titanium foil that rolls width-wise into a long tube, held by metal rings. Ultra-lightweight but tricky to set up alone in the wind.
The Spark Arrestor
This is a critical safety component. It is a mesh cap that sits on top of the chimney. It catches burning embers (sparks) before they fly out and land on your tent roof. Do not operate a hot tent without one, especially in a nylon tent.
The Physics of the Draft
Understanding “draft” is essential. Hot air rises. As the hot air goes up the chimney, it creates a vacuum in the stove, pulling fresh oxygen in through the intake vents.
- The Cold Plug: When you first light the stove, the pipe is cold. Smoke might spill into the tent because the draft hasn’t established. To fix this, burn a small, intense paper or twig fire right at the base of the pipe to heat it up quickly.
- The Damper: A small valve in the chimney pipe that controls airflow.
- Open: Maximum airflow, hot fire, fast burn. Used for starting the fire or boiling water quickly.
- Closed: Restricted airflow, slower burn. Used to make your wood supply last longer through the night.
Flooring Systems: To Floor or Not to Floor?
In summer camping, a tent floor is mandatory to keep bugs out. In winter hot tenting, the floor is optional, and experienced campers debate this hotly.
Option 1: The Snow Floor (No Floor)
You simply pitch the tent directly on the packed snow.
- Pros: You can walk in with crampons or boots without tearing fabric. You can spill wood chips and ash without worry. It is lighter to carry. You can carve out “furniture” (benches, tables) from the snow inside the tent.
- Cons: Moisture rises from the snow as the tent heats up. Items dropped on the floor get wet/lost.
- Verdict: Best for purists and hunters using cots.
Option 2: The Partial Floor / Tarp
You use a Tyvek sheet or tarp under your sleeping area, but leave a “cold well” or “mudroom” area near the stove exposed to the snow.
- Pros: Keeps your sleeping gear dry while allowing a safe zone for the stove and wet boots.
- Cons: Can be slippery.
- Verdict: The most common setup for recreational hot tenters.
Option 3: The Bathtub Floor
Some modern hot tents come with a zip-in bathtub floor with a cutout for the stove.
- Pros: Complete protection from moisture and drafts. Keeps gear clean.
- Cons: Heavy. You must be extremely careful not to burn the floor with embers or the hot stove legs.
- Verdict: Best for families or those who want a “clean” environment.
Is Hot Tenting Safe? The Real Risks
This is the most common question we get: “Isn’t it dangerous to have a fire inside a tent?” The answer is yes, if you are careless. But with proper protocols, it is very safe.
Carbon Monoxide (CO): The Silent Killer
This is the biggest risk. If your stove drafts poorly, or if the chimney gets blocked by creosote or snow, smoke and CO can back up into the tent. CO is odorless and colorless.
- Protocol 1: Ensure adequate ventilation. Never seal the tent completely. Leave a roof vent cracked open and the lower intake vent open to create fresh airflow.
- Protocol 2: Carry a battery-powered CO detector. This is non-negotiable. Place it at sleeping height (CO mixes with air, but you want to measure what you are breathing). Check our ultimate camping packing list for recommended models.
- Protocol 3: Clean your spark arrestor daily. Creosote (unburnt fuel) builds up on the mesh cap, clogging the chimney and forcing smoke back down. Tap the pipe every morning to knock soot loose.
The Burn Risk
Nylon and skin melt instantly when touching a hot stove.
- Layout: Keep the sleeping area distinct from the stove area. Store firewood in a designated zone, not piled haphazardly where it can roll against the stove.
- Clothing: Synthetic puffy jackets melt if they brush against the stove. Consider wearing wool or canvas outer layers when cooking inside.
- Sleeping: Most hot tenters let the fire die out before going to sleep. Sleeping with a roaring fire is risky because sleeping bags can shift and touch the stove. If you must run it overnight (in extreme cold), take shifts staying awake (“fire watch”).
Ice Safety
Hot tenters often camp on frozen lakes to access flat, open areas. The heat from the stove will not melt through 2 feet of lake ice, but it can melt the surface snow, creating a slushy puddle under your floor. Always use an insulated pad under the stove legs if camping on ice to prevent it from melting a depression and tipping over.
Fuel Management: The Science of Firewood
A hot tent is only as good as the wood you feed it. You cannot burn whole logs like a campfire. Small stoves require processed fuel.
Processing Wood
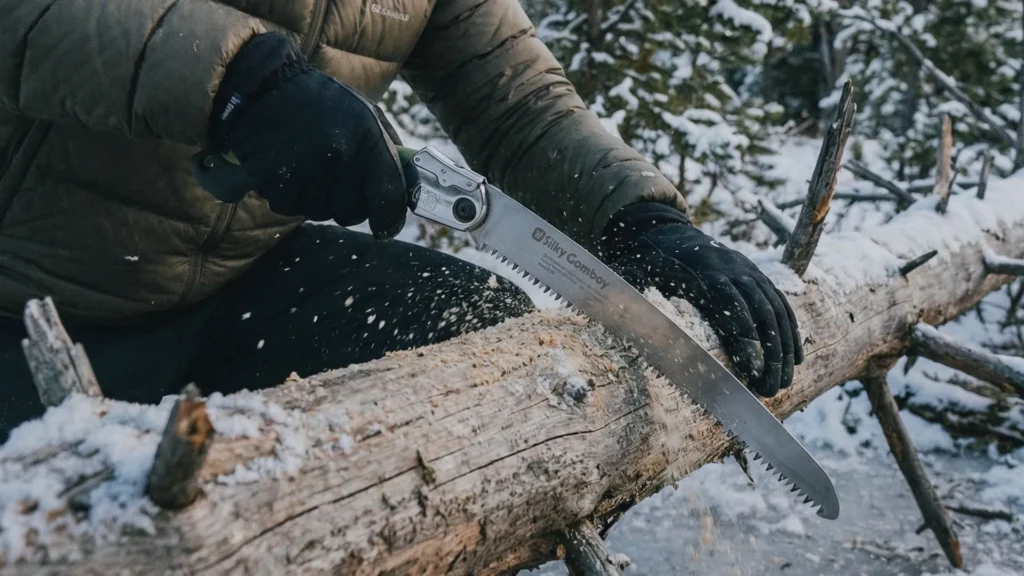
You need to process wood into small chunks, usually 10-12 inches long and split into wrist-thick pieces. This requires tools.
- The Saw: A high-quality folding saw (like a Silky) or a buck saw is essential for cutting dead standing trees.
- The Knife/Hatchet: You need to split the wood to expose the dry inner fibers. A sturdy fixed-blade knife allows for “batoning” (using a stick to hammer the knife through the wood), which is safer than swinging a hatchet in deep snow.
Hardwood vs. Softwood
- Hardwood (Oak, Maple, Birch): Burns slow and hot. Creates “coals” that radiate heat for hours. Ideal for the last load before bed.
- Softwood (Pine, Spruce, Fir): Burns fast and hot but burns out quickly. Contains resin (pitch) that creates creosote buildup in your chimney. Ideal for starting the fire quickly in the morning.
Compressed Logs (The Cheat Code)
If you are car camping (using a heavy tent like the Coleman WeatherMaster 6 adapted or a canvas tent), bring compressed sawdust bricks (like Bio-Bricks). They are ultra-dry, burn predictably, and fit perfectly in small stoves. They eliminate the need for processing wood in the cold.
Clothing & Sleep Systems for Hot Tenting
Just because you have a stove doesn’t mean you can pack light. The fire will go out.
The “Cold Snap” Strategy
When the fire dies at 3:00 AM, the tent temperature will plummet from 70°F to the outside temperature (e.g., -10°F) within 20 minutes. You must be dressed and sleeping in gear rated for the coldest possible temperature, not the heated temperature.
- Sleeping Bag: Use a 0°F or -20°F bag. Do not rely on the stove to keep you alive while you sleep.
- Clothing: Wear wool. Modern technical fabrics (nylon shells, polyester puffies) are plastic. If a spark lands on your expensive Gore-Tex jacket, it melts a hole instantly. Wool (merino or traditional) is naturally fire-resistant.
Managing Condensation (The “Raining” Phenomenon)
In single-wall hot tents, condensation can freeze on the walls. When you fire up the stove in the morning, that frost melts and “rains” down on you.
- The Fix: Use a tent liner (inner tent) which creates a barrier, or wipe down the frost with a pack towel before lighting the stove in the morning.
Setup Guide: Pitching in Snow
Pitching a hot tent in winter is different than pitching a Coleman Sundome 4 in the summer. You are dealing with snow, which is not a solid foundation until you process it.
Step 1: Pack the Pad
Do not pitch your tent on soft powder. Your body heat and the stove heat will melt the snow beneath you, creating a lumpy, icy mess.
- Method: Keep your snowshoes or skis on. Stomp out a platform roughly the size of your tent. Let it “sinter” (harden) for 30 minutes. This creates a concrete-like base.
Step 2: Deadman Anchors
Standard tent stakes are useless in soft snow. You need surface area.
- Snow Stakes: Wide, aluminum stakes with holes in them. The snow freezes through the holes to lock them in.
- Deadman Anchor: Tie your guy line to a stick, branch, or bag filled with snow. Bury it 1-2 feet deep in the snow and stomp on it. As the snow hardens, that anchor will never move.

Step 3: Stove Assembly
Assemble your stove outside the tent first to ensure the pipe is seated correctly. Then, place the stove inside.
- Stable Base: The stove will melt the snow underneath it. You must put the stove on a platform. Two green logs or a piece of plywood work well to prevent the stove from sinking and tipping over.
Step 4: Guy Out Everything
Winter storms bring heavy wind and snow loads. Use every single guy line point on the tent. Tighten the fabric until it is drum-tight to help snow slide off the roof rather than accumulating and collapsing the structure.
Ethics and “Leave No Trace” in Winter
Hot tenting has a higher impact than 3-season camping because of the wood consumption.
- Dead & Down Only: Never cut live trees for firewood. Green wood won’t burn well anyway. Only harvest dead standing trees.
- Ash Disposal: Do not dump your stove ash on the snow where it will look ugly when the snow melts. Pack it out or scatter it widely in the deep woods away from water sources.
- Burn Scars: If you use a snow floor, the stove heat won’t burn the ground. But if you are camping in shallow snow, ensure your stove heat doesn’t scorch the earth beneath the snowpack.
Comparison: Hot Tent vs. 4-Season Tent vs. 3-Season Tent
To clarify where a hot tent fits in your gear arsenal, let’s compare.
| Feature | 3-Season Tent | 4-Season (Mountaineering) | Hot Tent |
|---|---|---|---|
| Primary Goal | Ventilation & Bug Protection | Wind & Snow Load Resistance | Active Heat Generation |
| Material | Mesh & Polyester | Solid Nylon/Polyester | Canvas or Silnylon |
| Temperature | Ambient | Ambient + 5-10°F | 70°F+ (When stove is lit) |
| Weight | Lightweight | Medium | Heavy (Stove adds weight) |
| Moisture | High Condensation | Moderate Condensation | Very Low (Dry heat) |
| Comfort | Low in Winter | Medium | High (Luxury) |
FAQ: People Also Ask About Hot Tenting
Generally, no. Standard nylon or polyester tents are treated with flammable coatings and lack the structural integrity to support a stove jack safely. Modifying a non-fire-retardant tent is a significant fire risk. If you want to go the DIY route, you must sew in a high-quality silicone-fiberglass stove jack and ensure your tent fabric is far enough away from the radiant heat of the stove.
This is a classic rookie mistake. As the stove heats up, it radiates heat downward, melting a pit in the snow. Eventually, the stove tips over.
- The Solution: You must float the stove. Place two sturdy green logs (which won’t burn through quickly) or a piece of plywood/mineral wool board under the stove legs to distribute the weight and insulate the snow.
Yes, but it is not “hot tenting” in the traditional sense. Propane heaters (like a Mr. Heater Buddy) add moisture to the air, worsening condensation issues. They also do not provide the dry heat needed to dry out wet gear. A wood stove provides dry heat, which is the key to comfort in deep winter.
It varies wildly.
- Canvas Luxury: A quality canvas wall tent and stove can easily exceed $1,500.
- Budget (DIY/Steel): You can get a heavy steel stove ($100) and a budget teepee ($150) for around $250 total.
- Ultralight (Titanium): A titanium stove ($400) and a high-end silnylon shelter ($400+) can run over $800.
Not necessarily. Many winter campers prefer a “snow floor” or a partial tarp. A snow floor allows you to walk in with crampons and makes cleaning up wood chips easy. However, if you are camping with family or pets, a zip-in bathtub floor keeps things cleaner and prevents drafts, provided you protect it from the stove’s heat.
Final Verdict: Is Hot Tenting Worth It?
Hot tenting bridges the gap between the ruggedness of winter survival and the comfort of a cabin. It allows you to access the outdoors during the quietest, most beautiful season of the year without suffering.
It requires more skills than summer camping. You become a manager of heat, wood, and ventilation. You carry more weight. But the reward is sitting in a warm, glowing tent, sipping hot coffee while a blizzard rages outside.
If you are just getting into gear, check our best camping tents roundup to see where standard tents fall short in winter. If you are ready to embrace the cold, a hot tent is your ticket to loving winter rather than just enduring it.